
The world of digital advertising is changing quickly. While internet users have always cared about their online privacy, data collection has become more of a concern over the years. Apple’s new iOS 14 update includes new measures designed to give iPhone users more control over the data they share with apps and advertisers.
Naturally, these changes will have a significant impact on social media advertising. Marketers use user data for targeting and measuring the success of their ads, and Apple’s data collection changes will restrict what they can collect.
This extends to social media platforms like Facebook, but don’t stress.
In response to Apple’s iOS 14 update, Facebook has launched Facebook Conversions API to give advertisers a new, more private way to track advertising data.

This article will explore what Facebook Conversions API is, what you can do with it, how it’s different from Facebook pixel and how to set it up.
Facebook advertising data collection basics
To learn what Facebook Conversions API is, you first need to understand some Facebook advertising data collection basics.
When a Facebook user clicks on one of your ads and goes to your website, Facebook Conversions API collects that data and shares it with you.
Now, let’s cover some key terms used in this article:
Event. An event is an action taken by a user that generates data, like clicking on a Facebook ad or making a purchase.
API. An Application Programming Interface (API) is a tool that allows two programs to share data. In the context of the Facebook Conversions API, this allows your website conversions to be reported through Facebook.
Browser-side tracking. Browser-side tracking is a data collection method that tracks data from a user’s web browser. This data includes demographic information like the user’s country. Sometimes, browser-side tracking is called client-side tracking.
Server-side tracking. Server-side tracking collects user data from the server’s end. This includes data like the amount of time a user spent on a web page or which items they’ve added to their shopping cart.
With these terms in mind, let’s revisit Facebook Conversions API.
What is Facebook Conversions API?
Facebook Conversions API is a tool that allows advertisers to collect data using server-side tracking rather than browser-side tracking.
If you are familiar with Facebook’s Server-Side Events, this concept will sound familiar. Facebook Conversions API is simply a new version of Server-Side Events.
At this point, you may be wondering what role Apple’s iOS 14 update plays in this. The update does two key things:
- It gives iOS 14 users the ability to turn off browser-side tracking.
- It limits the data advertisers can collect from iOS 14 users.
These changes will take effect in the next few months. When this happens, advertisers will need to rely on Facebook Conversions API to collect data about their users’ interactions with their Facebook ads.
It’s important to note that Facebook’s Conversions API and Apple’s iOS 14 update did not happen in a vacuum. Both result from a shift in the way platforms and governments think about data (the same change has also brought us Europe’s General Data Protection Regulation (GDPR) laws).
How does Facebook’s Conversions API work?
Facebook Conversions API connects your website to your Facebook ads. When a user clicks on one of your ads, Facebook generates a unique ID number for that user. As the user moves around your website, Facebook tracks their movements and sends that data to you.
This means that you can still collect data about your Facebook ads while your customer’s identity and privacy are protected with a unique ID.
Now that we’ve covered the basics of Facebook Conversions API, let’s dive into more detail.
What can you track with Facebook Conversions API?
This article has already discussed the data you can’t collect with Facebook’s Conversions API – but what data can you collect?
Conversions API allows advertisers to track data on the following conversion events:
- Leads
- Affiliate payments
- Phone calls
- Form submissions
- Email subscription
- Subscription changes
- Purchases
- Find locations
That means that, as an advertiser, you can collect detailed data on:
- Purchasing. Including what your customers purchase, how much they spend per transaction and how they checkout.
- Shopping carts. Including what your customers add into their shopping carts, which items they remove, where they add items from and how long they leave their shopping cart for.
- Website browsing. Including what web pages customers visit, which internal links they use and whether they click on cross-sell or up-sell promotions.
- Email sign-ups. Including when people sign up, which webpage they sign up through and which email sign-up settings they choose (if that’s an option on your website).
- Checking out. Including the rate of cart abandonment and how successful the checkout process is.
- Customers. Including how long they spend on your website and whether they revisit your website.
- Advertising. Including your ad’s click-through rate (CTR) and metrics like your Cost Per Thousand Views (CPM).
Collecting this data will give you an accurate picture of your customer’s journey. Long term, this will help you improve your Facebook ad conversion rates (which average 9 – 10% for most advertisers).
Now, let’s see how Conversions API compares to the Facebook pixel.
Facebook pixel vs. Facebook Conversions API
If you have ever run a Facebook ad, you’re familiar with the Facebook pixel.
The Facebook pixel is an analytics tool that allows advertisers to track user activity on the platform and beyond. Using the Facebook pixel, you can measure the performance of your ads and the behaviors of users who clicked through to your website.
The pixel works through a simple three-step process.
- You add the pixel code to your website.
- A Facebook user visits your website and takes an action (for example, adding an item into their cart).
- Facebook pixel reports that information to you in Facebook Events Manager.
Pixel might sound the same as Conversions API, but there are two critical distinctions between the two tools:
- Facebook collects data through the pixel while you collect data with Conversions API.
- The pixel uses browser-side tracking, while Conversions API uses server-side tracking.
Let’s look at some pros and cons of the Facebook Conversions API and the Facebook pixel.
Facebook Conversions API pros and cons
Pros
- It marks users with a unique ID to protect their privacy
- It gives advertisers a clear picture of their sales funnel
- It does not rely on cookies
- It tracks the success of your advertising
- It’s very accurate (as it doesn’t rely on third-party data from Facebook)
- It works offline and online
Cons
- It won’t allow you to identify Facebook users
- You must verify your domain for it to work
Facebook pixel pros and cons
Pros
- It identifies Facebook users by their profile
- It gives you detailed demographic information about your website visitors
- It tracks the success of your advertising
Cons
- The iOS 14 update prevents the Facebook pixel from tracking some data
- Many ad blockers block the Facebook pixel from collecting data
- It sometimes provides inaccurate data (due to VPN’s, ad blockers and privacy software)
Naturally, advertisers should use Facebook pixel and Facebook Conversions API together – as both have their unique benefits.
Here’s how to set them up.
How to set up the Facebook Conversions API
If you advertise on Facebook, you’ll want to set up the Facebook Conversions API as soon as possible.
This section will walk you through the whole setup process, from setting up your account to collecting user data.
Let’s get started.
Step 1: Set up Facebook Business Manager and Facebook pixel
To use Facebook Conversions API, you will need to use Facebook Business Manager and Facebook Pixel. If you have already set both of these up, jump to Step 2.
Setting up Facebook Business Manager is very easy. You simply need to:
To go business.facebook.com. Then, click Create Account in the top right corner.
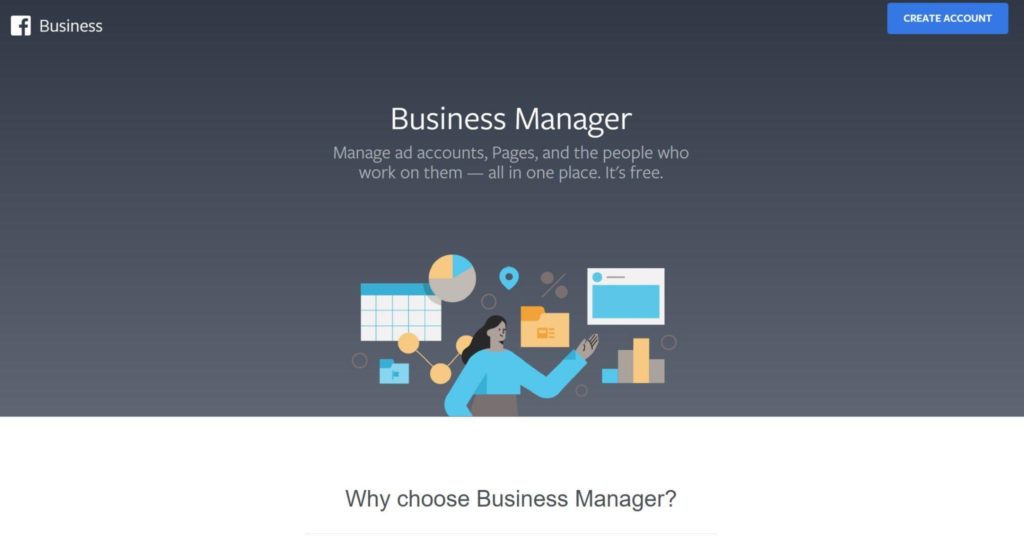

Source: Facebook
Fill in your details and click Next.
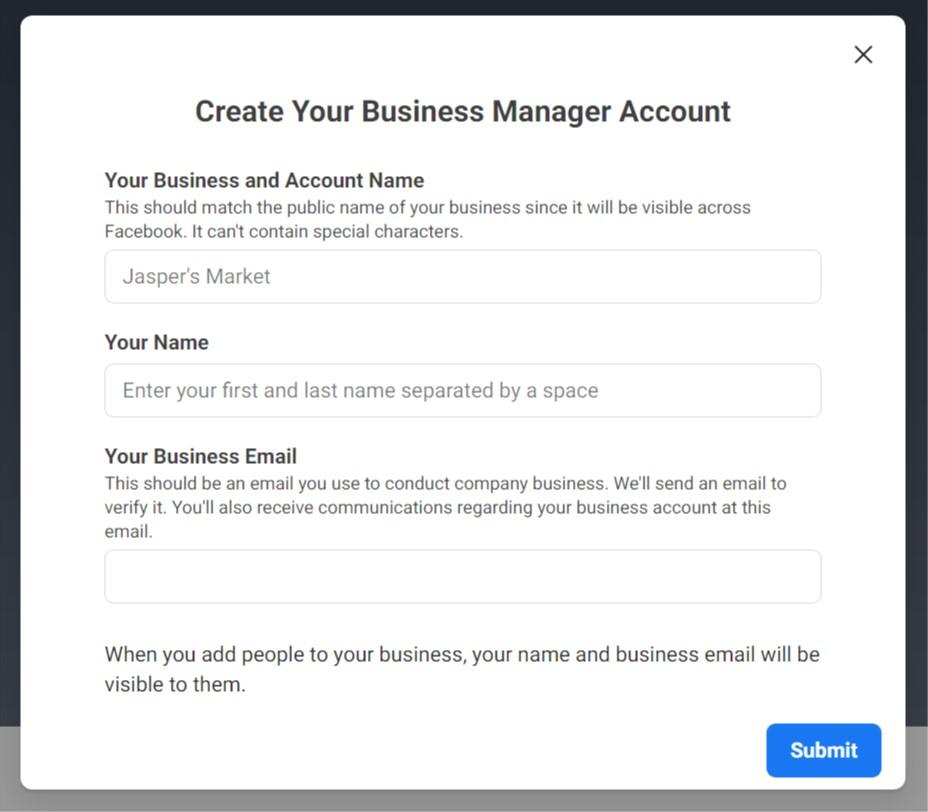

Source: Facebook
- Go to your inbox and locate Facebook’s verification email. Open the email and click Confirm Now to open your account. This will take you to your dashboard.
- Start a Facebook Page by clicking the Add Page button (don’t feel like you have to finish your Page now, you can always customize it later).
- Go back to the dashboard and click Add Accounts to Business Manager. From here, you can create a new account, add an account or request access to an account. This will connect your Business Manager account to a Facebook ads account.
Once you have set this up, you will have access to the Facebook pixel. Here’s how to install it on your website.
- Go to your Business Manager Dashboard and click Business Settings.
- Click Data Sources, then select Pixels and Add.
- Name your pixel and select Continue.
- Click Set Up The Pixel Now.
- Choose Use a Partner if you use a website host like WordPress. Follow these instructions if you want to add the pixel’s code manually.
From here, you can set up pixel conversion events using the Open Event Setup Tool (though you will need to set up your ads and Facebook business page first).
For more information on setting up and using the Facebook pixel, go to our guide.
Step 2: Verify your domain
You’ll need to verify your domain with Facebook before you use the Facebook Conversions API. Verifying your domain is Facebook’s way of reducing spam by ensuring that advertisers only direct users to legitimate websites.
To verify your domain, go to Facebook Business Manager and open Business Settings. Then, click Brand Safety and select Domains. This screen will show you your verified domains or a notice saying “(your business) doesn’t have any domains yet.”
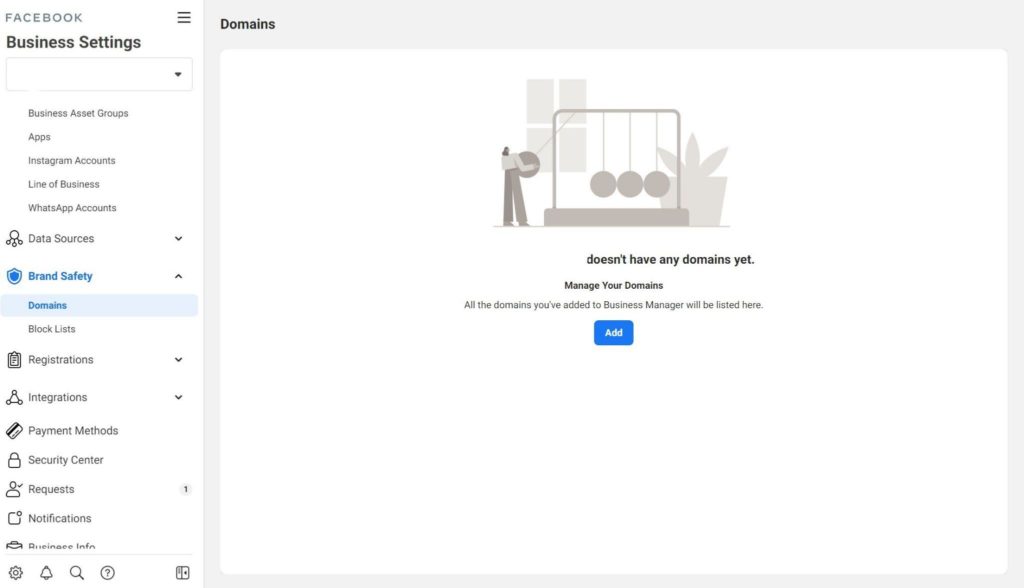

Source: Facebook
From this page, click Add to bring up the “Add a Domain” screen. Type in your domain name and click Add Domain to continue.
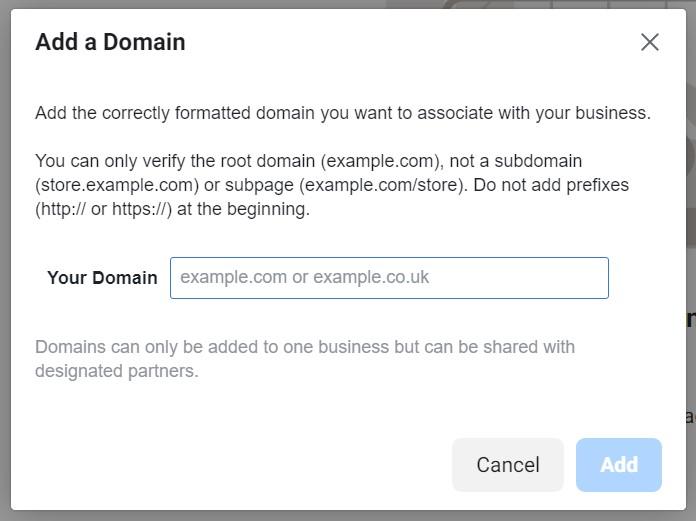

Source: Facebook
Next, you’ll need to choose a verification method. There are three options to choose from: DNS verification, HTML file upload verification and meta-tag verification.
DNS verification
- Log into your domain and find DNS Records.
- Copy the TXT record Facebook provides in “Verify your Domain.” Follow your website host’s instructions to add this record to your website.
- Go back to Facebook Business Manager and click Verify Domain.
HTML file upload verification
- Download the HTML verification file Facebook provides in “Verify your Domain.”
- Log into your domain and find your website’s root directory.
- Upload the HTML file using the instructions provided.
- Go back to Facebook Business Manager and click Verify Domain.
Meta-tag verification
- Copy the meta-tag Facebook provided in “Verify your Domain.”
- Log into your domain and find your source code. Find the <head> …. <head> section and paste the meta-tag.
- Click Publish.
- Go back to Facebook Business Manager and click Verify Domain.
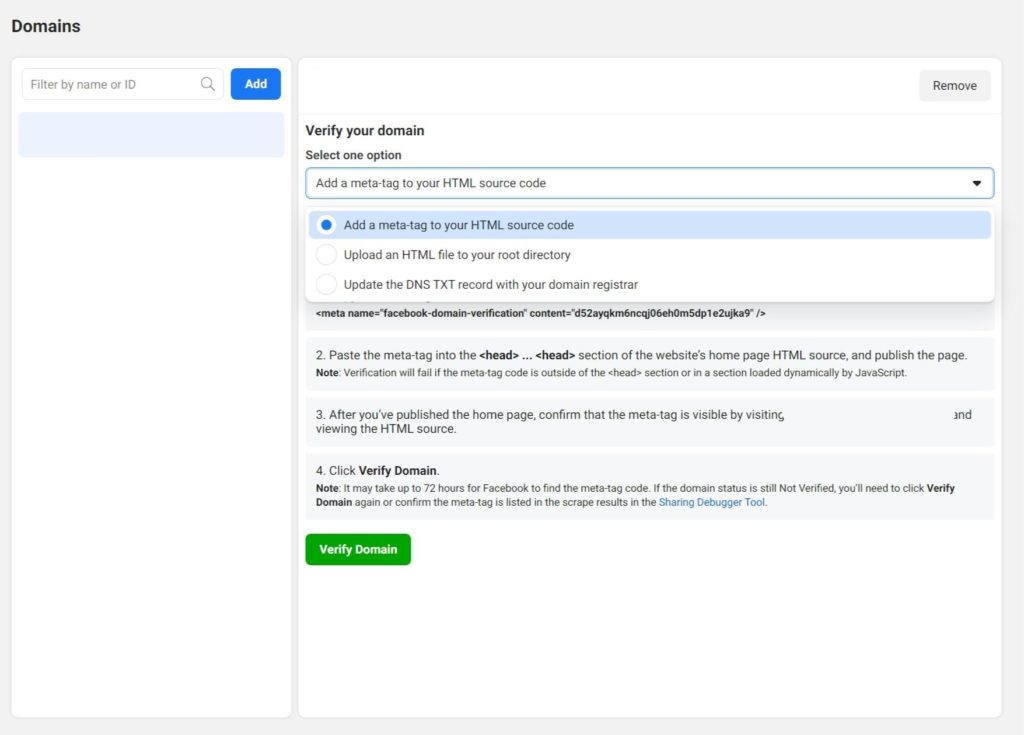

Source: Facebook
Note: It may take up to 72 hours for Facebook to verify your domain.
Step 3: Set up Facebook Conversions API
Next, you’re ready to set up Facebook Conversions API. During this stage, you will need to connect your website with Facebook.
To do this, go to Facebook Events manager and click Settings. Scroll down until you find Conversions API and click Choose a Partner. Then, select your partner and click Next.
Next, check both boxes:
- Advanced matching
- New: Measure More of Your Customer’s Journey by Enabling the Conversion API
Click Create Access Token. Save your token for later and click Continue.
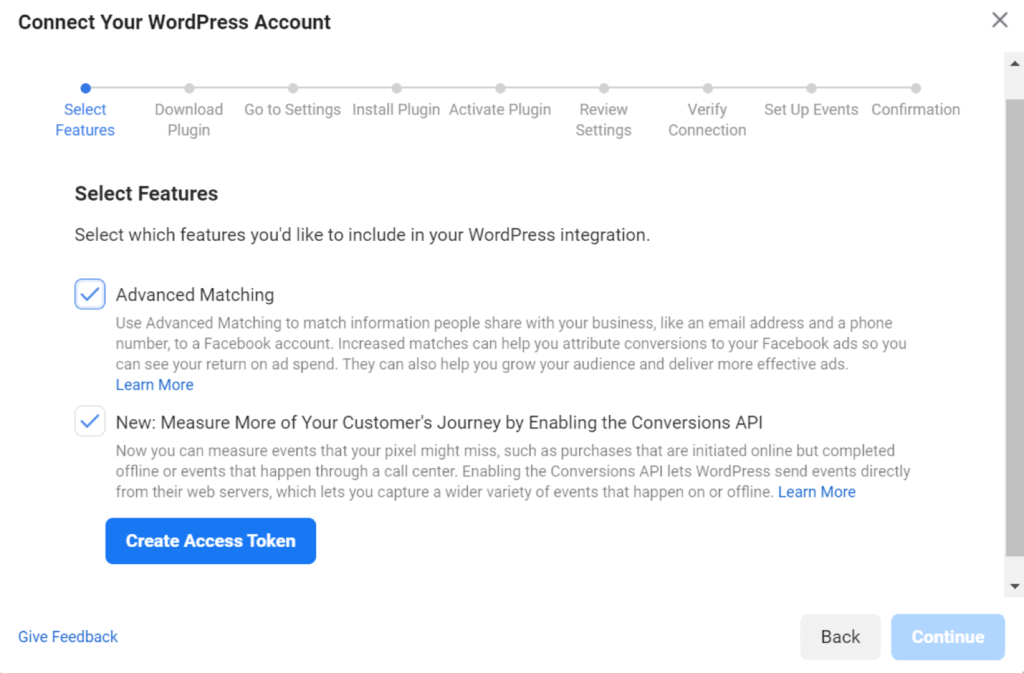

Source: Facebook
Next, you’ll need to download Facebook’s plugin and click Continue.
In your website’s backend, go to plugins. Then, upload and install Facebook’s plugin. Make sure to activate it.
Both Use Advanced Matching on Pixel? and Use Server-Side API? should be enabled.
Next, paste the access token you copied earlier into the Pixel ID bar and click Save.
Facebook will tell you if you have configured Facebook Conversions API correctly (though you may have to wait a few minutes).
Note: If you are having trouble configuring Conversions API, make sure you update Facebook’s plugin. If the plugin is out of date, it will not configure correctly.
Step 4: Set up events
Once you have connected your website to Facebook, you need to set up events. If you are a seasoned Facebook advertiser, you may have already set up your events (jump to Step 5 if that is the case).
First, you’ll need to go to Facebook’s Connect your (Partner Integration) Account screen. You should see the Add Events Using Event Setup Tool section. Here, enter your website URL and click Continue.
NOTE: If you accidentally close this screen, go to Facebook Events Manager, click Settings, then Open Event Setup Tool.
You will then see the Event Setup Tool. From this page, you can set up as many events as you like. Remember that you can always come back to this page, so if you are setting up your account for the first time, you might want to set up one event and come back later.
Once you have finished, click Finish to close the setup widget.
Step 5. Configure your events
Once you set up your events, you’ll need to configure them. To complete this step, go to Facebook Events Manager and click Overview. Then, select Aggregated Event Measurement and Configure Web Events.
Select your verified domain to open your events. On this screen, Facebook will show you a list of events from high priority to low priority. This screen will also allow you to edit, delete, re-order and customize your events to your needs.
Step 6. Test that everything is working
Now that you have set up Conversions API and created some events, you need to make sure everything is working correctly. Thankfully, Facebook provides a widget that lets you test your events.
To start the test, go to Facebook Events Manager and click Data Sources. Then, click Test Events and Test Server Events. Next, click Graph API Explorer and follow the prompts to create a test.
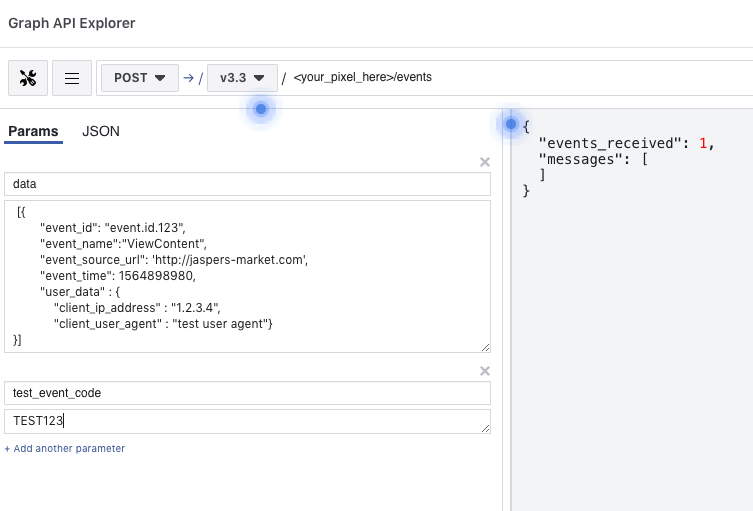

Source: Facebook
Facebook will then use that payload to test whether the Conversions API is working correctly. The test should take around 30 seconds.
Step 7. Run your first Conversions API ad
Now that you’ve made it this far, it’s time to run your first post-Conversions API ad. If you are new to Facebook advertising, check out our guide to Facebook advertising for best practices on targeting, budgeting, testing and more.
Note: At this stage, you may be wondering if pixel and Conversions API will send you duplicate data. Thankfully, the answer is no. Facebook has a built in tool that prevents the tools from reporting the same user data.
Conclusion
Facebook Conversions API is a must for advertisers in a post-iOS 14 update world. With this tool, you can gather detailed, accurate information on how your Facebook ads drive customers while protecting their identities.
Although it can take time to adjust to a new social media tool, setting up and using the Facebook Conversions API is well worth your time. While it won’t show you the Facebook profiles of your customers, it will help you optimize your website to give customers what they want and increase your sales.
Using the instructions in this guide, you can easily set up the Facebook Conversions API and connect it to your website. What you do with it from there is up to you and your imagination.